Tuesday, April 26, 2011

Texture Tuesday, 26th April

Hello dear readers,

I thought I would attempt another lovely texture over one of my flower photos. This texture, 'Serendipity' was provided by the talented Kim Klassen. I wanted to change the original camellia photo into one that looked like a flower within a water color painting. I think I managed to achieve a little of this effect.

The photo was changed by adding ---  2 layers of texture 'serendipity.'
                                                       ---  the 'multiply' blending mode was used on both layers.
                                                       ---  Layer 1 had 100% opacity.        
                                                       ---  Layer two had 20% opacity.


Camellia photo with Kim Klassen's 'Serendipity' texture.


What do you think? 

A certain family member, who shall remain nameless, says it looks like the flower has gone "rotten!"
Yes, I do know camellias can go a little brown on the edges if their petals are handled when picked and I think that was what was meant!  Maybe it needed an additional texture layer, particularly in the upper left to soften the leaves....? 

Anyway, this is a fun process. It is only my second attempt at it, so there is still much to be learnt!

There is a Texture party and giveaway as well....

Please click on the "Texture Tuesday" photo link on the side of my blog to take you to Kim's site and also to see other participants' photos with textures, enjoy......


Cheers,

Sunday, April 24, 2011

Easter Sunday Macro

Hello dear readers,

Sunday is Macro day for me, or technically 'close-up' day, as although my little point and shoot has a macro setting, for the purists out there , it really is not true macro.
However,  for this exercise it is more than adequate! I love my macro setting!

This wonderful idea was started by Lori at Studio Waterstone.
Click on the 'I heart Macro' photo link on the  left side of my blog to take you there and see what all the other lovely participants have managed to find with their macro settings/lenses.


Yum!

Half gone!

Little ribbed beads.

Hope you have all had an enjoyable Easter with family and friends.

Cheers,


Saturday, April 23, 2011

Glass Classes and New Colors

Hello dear readers,

Sorry, I have been absent this last week or so. Life has been a little busy.

One of the things I have been doing this week was a  3 day glass bead making workshop with guest teacher, Corina Tettinger. It was held at Jacquie Campbell's studio in Hurstbridge, about an hours (easy) drive from my home. There were 9 students altogether, most from Victoria, but 3 students had travelled interstate to do the course.
It was an intense  3 days of learning and re-visiting techniques, from 10 -6pm, fortified with plenty of coffee and delicious home made lunches whipped up by Jacquie. Thanks for that, Jacquie!

Corina is a lovely and very witty lady and a very generous teacher.
The class, ( " Glass Masterclass" ) covered  some of the techniques from Corina's book, 'Passing the Flame'

Some of the topics included, dot application and manipulation, encased stringer and striped cane making, a few different methods of murrini making and stringer control, to name a few!
The  wonderful 3 days finished with Corina  showing us how to put together a lot of the elements we had learnt over the previous three days, in a 'tidepool bead'. Corina also spoke about bead design and what to consider when placing design elements on different shaped beads.

I found some things in the course easier to manage than others....I will definately have to practice my stringer control!!
Here a few pictures from the course.


Jacquie's new studio (named after her little black dog, Licorice)

Corina  heating a murrini gather of glass

The beautiful finished murrini gather,  sliced through to show complex pattern.

Corina's sample demonstration beads from the class.

Next week I will be repeating the drive to country Hurstbridge, to take Corina's Floral bead making class.
I am looking forward to that. No doubt there will be much to learn and MANY challenges for me in this class! 


I also thought I would include a photo of some new glass colored rods by CIM, that arrived on my doorstep yesterday. They are totally delicious! I just love the beautiful  transparent Azure. This color is a stronger and more vibrant color than Effetre intense blue in rod form,  I can't wait to see what it looks like in a bead. Celadon is not a new color, however the one pictured above is a unique form, different than the usual, this one is slightly darker.

Until next time ,


Sunday, April 17, 2011

I Heart Macro

Hello dear readers,

I have always loved taking macro photos. The everyday items we see around us appear SO different when photographed in a macro mode.
I do not possess a SLR camera with a macro lens, just a little point and shoot camera adjusted to it's macro setting.
That's all you need for a bit of photographic fun!

Here are a few photos I captured this weekend.


Please click on the I Heart Macro picture on the left hand side to take you to more photos by other macro- lovers . It is hosted by Lori at studio Waterstone

cheers,


Friday, April 15, 2011

First Texture.

Hello dear readers,

I have come to the world of Kim Klassen through the wonderful, sharing blogging community.
Kim teaches online photoshop courses and also has a "TextureTuesday" site where people can "texturise" their photos and re-post them for viewing.

This is the first time I have ever done this, as I am a real novice at photoshop, so please be kind...!
I actually watched x2 videos by Kim first before attempting this fun process and found them  to be very helpful.


"Remembering Molly"

The original color of this saucer was actually pale green.
To give the photo that misty, aged appearance, I used two texture layers made by Kim.
These were 'Sweet Treat' and 'Silence'

What a fab effect, isn't it?
I can't wait to give it another go.

Please click on the sidebar icon for Texture Tuesdays" to see other photos that people have texturised and to read more about Kim's site.

Until next time,


Thursday, April 14, 2011

Back in the saddle!

Hello dear readers,

Well, we have been home almost two weeks ago from the "big trip". I spent the first week or so doing those inevitable clean-up chores, emptying suitcases, washing, ironing and generally tidying and catching up with family and friends.

This week, I thought it about time I went back to my little studio and made some beads!
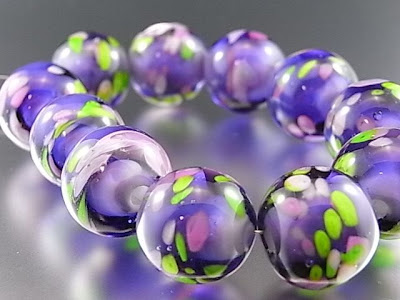
After an absence from my torch, I always warm up with some simple basics, so yesterday I spent some time making 'encased rounds'

These beads have a layer of white, encased in Effetre transparent ink blue, rolled in Fleeting Beauty Frit by Val Cox and then lastly encased in clear.

I used a round  bead roller  shaping tool to finish these beads and give them a nice fat round shape.
I have not really used many shaping tools yet, preferring to use mainly a simple marvering paddle and gravity, but I had a lot of fun using these and will definately  continue to use it.

Round beads made with a roller.

Roller cavities

As it is Autumn here in Australia, I thought I would add in a photo of the colored leaves of  an ornamental grape which grows across  a trellis next to my family room window.
The long tendrils that dangle down are absolutely beautiful especially in Autumn but also in Spring when the new growth comes out and develops  a thick curtain of leaves protecting the room against our harsh sun.

Just look at that beautiful color!

Until next time, 


Tuesday, April 12, 2011

A Blog Giveaway

Hello dear readers,

Just thought I would let you know that the very generous Lori Anderson of  Pretty Things has had a successful trip to BeadFest and is having a giveaway on her blog of some items she purchased there.
Here is a photo of two of the goodies you could win.  I LOVE the colors of these faux suede lengths.


A yard each of faux suede from Barbara Lewis


Two stamps from PJ Tool and Supply

Click here to take you to Lori's blog for an opportunity to win one of the six items she is showing there and to see  photos of other items she purchased at BeadFest.

cheers for now,

Tuesday, April 5, 2011

Beads from Hong Kong

Hello dear readers,

I have tried to purchase a few beads in each place we have visited.
We browsed the markets of Hong Kong, and, on the first stall at the first market on the first day in Hong Kong, I found some interesting beads.
Actually, I was quite excited which I was sure must have been apparent to the stall holder, even though I did try valiantly not  to show it. These guys have a sixth sense though and they can tell a person quite easily who is obviously fresh off the plane and not too good at bargaining!
So, the obvious did happen and we found out days later our little "bargain" was no bargain at all!

I have since learned that a bargain is really only a bargain in your own eyes if you want it badly enough!
Well, that's my theory and I'm sticking with it!

The bangles are Jade( debatable) Carnelian and Agate.


Tibetan(VERY debatable!) Dzi beads made from agate.
The red ones are glass.


Cute little clock pendant that I thought was unique until I saw it again and the again over the next few days! Oh well, I still love it.

The other aspect of bead buying that I really struggle with is authenticity. I am not someone who works a lot with gemstones, semiprecious etc, even though I really love them. So I am not terribly familiar with the real ones, let alone the copies!
I tend to be gullible enough to believe anyone if they tell me what the stone is, that is just my nature.
I think more than likely, each and every one of the larger stones (apart from the red glass ones ) are very good copies of what they are meant to be.
How on earth does one learn to know real from  a good copy, in a market that is SO clever at reproducing the original.??!! 

Anyway, real or copy, I still like them and will use them in my own personal jewelry.
I could not, in all honesty sell or give them knowing they may not be the real deal.

Are there any others who struggle with this problem or do you just believe/know and accept what you get is always authentic?

I guess the point is to buy from a reputable sales person and not a Hong Kong street market! LOL
Simple really.......!

Anyway guys, 

until tomorrow, 


Monday, April 4, 2011

Victoria and Albert Museum, London

Hello dear readers,

To those that have been following my posts during my month away," thankyou."
I have appreciated your comments along the way and have enjoyed staying connected with friends and family.
I am now back at home in Melbourne, Australia
It is wonderful to see my two beautiful daughters again, and my little dog, Pepper, who is now sitting at my side as I write this post.

I did not really complete posting about our journey, so even though I am home, I am going to still write a few more travel- type posts to complete the  trip.

After writing about the British Museum, I was advised to visit The Victoria and Albert Museum  in  South Kensington, London. Which we duly did!

I was so excited to see this wonderful sculptural 'chandelier' by Dale Chihuly in the main entrance atrium of the museum. I have only known about Dale's work for the  last 3 or 4 years,  and was consequently, thrilled to see one of his pieces in real life.
For those who are not aware of Dale's work, I will endeavour to explain. Dale has worked with glass for the last 50 years. He creates LARGE exhibitions of glass, wonderful  sculptural explosions of color and movement. Some of the sculptural pieces and components are almost like flowers, almost like "triffids", all of them are mind blowing, in my personal opinion.
Anyway, it's probably better that I show you, rather than try and explain!


Dale Chihuly glass chandelier.

Fantastic, isn't it!
What is not particularly apparent in these photos is the SIZE. It is 11 metres high!!
I also found out his work is exhibited in over 200 museums world-wide.

We spent only a small amount of time browsing this wonderful museum. Like most good museums, we really needed to spend DAYS there to give it full justice. 
I was dragging my feet somewhat, travellers exhaustion, aching back and legs had really set in with me at this stage, so we really did not see a lot of this wonderful museum.
I  did however see the glass and jewelry rooms! Well, of course, that's the least I could do!!
Here are a couple of photos from the glass room.


Rod formed pendant and beads from the Eastern Mediterranean.
(a type of evil-eye bead?)

Old glassware, loved the colored embellishments on the side.
(I thought I could try and do something like this on a glass bead.)


I could go on, adding more glass-type photos, but will not bore you any further!
My addiction to glass beads, has, over the years also fuelled my interest in glass in general, hence all the other "glassy" photos.

Well, must away, I have a couple of suitcases worth of unpacking and clothes washing. Groan!
The boring bit!

Cheers,
Jenni


LinkWithin

Related Posts Plugin for WordPress, Blogger...